Robert C. Martin: The Clean Coder


book cover Friends recommended me to read The Clean Coder: A Code of Conduct for Professional Programmers by Robert C. Martin. And recently I read it. The book explains some parts of engineer’s work, makes some useful points. And proves them with real life stories. Most of things in the book are well known, but it’s nice that author describes not only “good path”, but also situations when something gone wrong.

By the way, the book is interesting to read.

Writing breakout clone with micropython


I have pyboard, OLED display (SSD1306) and joystick (Keyes_SJoys), so I decided to try to make breakout clone. First of all I decided to create something like a little framework, that will be a bit similar to React, and all game can be formalized just in two functions:

  • (state) → new-state – controller that updates state;
  • (state) → primitives – view that converts state to generator of primitives.

For example, code that draws chess cells and invert it on click, will be like:

from lib.ssd1306 import Display
from lib.keyes import Joystick
from lib.engine import Game, rectangle, text


def is_filled(x, y, inverted):
    fill = (x + y) % 40 == 0
    if inverted:
        return not fill
    else:
        return fill


def view(state):
    # Display data available in state['display']
    for x in range(0, state['display']['width'], 20):
        for y in range(0, state['display']['height'], 20):
            # rectangle is bundled view that yields points
            yield from rectangle(x=x, y=y, w=20, h=20,
                                 fill=is_filled(x, y, state['inverted']))


def controller(state):
    # Joystick data available in state['display']
    if state['joystick']['clicked']:
        return dict(state, inverted=not state['inverted'])
    else:
        return state

initial_state = {'inverted': False}
chess_deck = Game(display=Display(pinout={'sda': 'Y10',
                                          'scl': 'Y9'},
                                  height=64,
                                  external_vcc=False),
                  joystick=Joystick('X1', 'X2', 'X3'),
                  initial_state=initial_state,
                  view=view,
                  controller=controller)

if __name__ == '__main__':
    chess_deck.run()

In action:

Chess photo

From the code you can see, that views can be easily nested with yield from. So if we want to move cell to separate view:

def cell(x, y, inverted):
    yield from rectangle(x=x, y=y, w=20, h=20,
                         fill=is_filled(x, y, inverted))


def view(state):
    for x in range(0, state['display']['width'], 20):
        for y in range(0, state['display']['height'], 20):
            yield from cell(x, y, state['inverted'])

And another nice thing about this approach, is that because of generators we consume not a lot of memory, if we’ll make it eager, we’ll fail with MemoryError: memory allocation failed soon.

Back to breakout, let’s start with views, first of all implement splash screen:

def splash(w, h):
    for n in range(0, w, 20):
        yield from rectangle(x=n, y=0, w=10, h=h, fill=True)

    yield from rectangle(x=0, y=17, w=w, h=30, fill=False)
    # text is bundled view
    yield from text(x=0, y=20, string='BREAKOUT', size=3)


def view(state):
    yield from splash(state['display']['width'],
                      state['display']['height'])

It will draw a nice splash screen:

Splash screen

On splash screen game should be started when user press joystick, so we should update code a bit:

GAME_NOT_STARTED = 0
GAME_ACTIVE = 1
GAME_OVER = 2

def controller(state):
    if state['status'] == GAME_NOT_STARTED and state['joystick']['clicked']:
        state['status'] = GAME_ACTIVE
    return state


initial_state = {'status': GAME_NOT_STARTED}

Now when joystick is pressed, game changes status to GAME_ACTIVE. And now it’s time to create view for game screen:

BRICK_W = 8
BRICK_H = 4
BRICK_BORDER = 1
BRICK_ROWS = 4

PADDLE_W = 16
PADDLE_H = 4

BALL_W = 3
BALL_H = 3


def brick(data):
    yield from rectangle(x=data['x'] + BRICK_BORDER,
                         y=data['y'] + BRICK_BORDER,
                         w=BRICK_W - BRICK_BORDER,
                         h=BRICK_H - BRICK_BORDER,
                         fill=True)


def paddle(data):
    yield from rectangle(x=data['x'], y=data['y'],
                         w=PADDLE_W, h=PADDLE_H,
                         fill=True)


def ball(data):
    yield from rectangle(x=data['x'], y=data['y'],
                         w=BALL_W, h=BALL_H, fill=True)


def deck(state):
    for brick_data in state['bricks']:
        yield from brick(brick_data)

    yield from paddle(state['paddle'])
    yield from ball(state['ball'])


def view(state):
    if state['status'] == GAME_NOT_STARTED:
        yield from splash(state['display']['width'],
                          state['display']['height'])
    else:
        yield from deck(state)


def get_initial_game_state(state):
    state['status'] = GAME_ACTIVE
    state['bricks'] = [{'x': x, 'y': yn * BRICK_H}
                       for x in range(0, state['display']['width'], BRICK_W)
                       for yn in range(BRICK_ROWS)]
    state['paddle'] = {'x': (state['display']['width'] - PADDLE_W) / 2,
                       'y': state['display']['height'] - PADDLE_H}
    state['ball'] = {'x': (state['display']['width'] - BALL_W) / 2,
                     'y': state['display']['height'] - PADDLE_H * 2 - BALL_W}
    return state


def controller(state):
    if state['status'] == GAME_NOT_STARTED and state['joystick']['clicked']:
        state = get_initial_game_state(state)
    return state

Game screen

And last part of views – game over screen:

def game_over():
    yield from text(x=0, y=20, string='GAMEOVER', size=3)


def view(state):
    if state['status'] == GAME_NOT_STARTED:
        yield from splash(state['display']['width'],
                          state['display']['height'])
    else:
        yield from deck(state)
        if state['status'] == GAME_OVER:
            yield from game_over()

Game screen

So we ended up with views, now we should add ability to move paddle with joystick:

def update_paddle(paddle, joystick, w):
    paddle['x'] += int(joystick['x'] / 10)
    if paddle['x'] < 0:
        paddle['x'] = 0
    elif paddle['x'] > (w - PADDLE_W):
        paddle['x'] = w - PADDLE_W
    return paddle


def controller(state):
    if state['status'] == GAME_NOT_STARTED and state['joystick']['clicked']:
        state = get_initial_game_state(state)
    elif state['status'] == GAME_ACTIVE:
        state['paddle'] = update_paddle(state['paddle'], state['joystick'],
                                        state['display']['width'])
    return state

Never mind performance, it’ll be fixed in the end of the article:

Now it’s time for the hardest thing – moving and bouncing ball, so there’s no real physics, for simplification ball movements will be represented as vx and vy, so when ball:

  • initialised: vx = rand(SPEED), vy = √SPEED^2 - vx^2;
  • hits the top wall: vy = -vy;
  • hits the left or right wall: vx = -vx:
  • hits the brick or paddle: vx = vx + (0.5 - intersection) * SPEED, where intersection is between 0 and 1; vy = √SPEED^2 - vx^2.

And I implemented something like this with a few hacks:

BALL_SPEED = 6
BALL_SPEED_BORDER = 0.5


def get_initial_game_state(state):
    state['status'] = GAME_ACTIVE
    state['bricks'] = [{'x': x, 'y': yn * BRICK_H}
                       for x in range(0, state['display']['width'], BRICK_W)
                       for yn in range(BRICK_ROWS)]
    state['paddle'] = {'x': (state['display']['width'] - PADDLE_W) / 2,
                       'y': state['display']['height'] - PADDLE_H}

    # Initial velocity for ball:
    ball_vx = BALL_SPEED_BORDER + pyb.rng() % (BALL_SPEED - BALL_SPEED_BORDER)
    ball_vy = -math.sqrt(BALL_SPEED ** 2 - ball_vx ** 2)
    state['ball'] = {'x': (state['display']['width'] - BALL_W) / 2,
                     'y': state['display']['height'] - PADDLE_H * 2 - BALL_W,
                     'vx': ball_vx,
                     'vy': ball_vy}
    return state


def calculate_velocity(ball, item_x, item_w):
    """Calculates velocity for collision."""
    intersection = (item_x + item_w - ball['x']) / item_w
    vx = ball['vx'] + BALL_SPEED * (0.5 - intersection)
    if vx > BALL_SPEED - BALL_SPEED_BORDER:
        vx = BALL_SPEED - BALL_SPEED_BORDER
    elif vx < BALL_SPEED_BORDER - BALL_SPEED:
        vx = BALL_SPEED_BORDER - BALL_SPEED

    vy = math.sqrt(BALL_SPEED ** 2 - vx ** 2)
    if ball['vy'] > 0:
        vy = - vy
    return vx, vy


def collide(ball, item, item_w, item_h):
    return item['x'] - BALL_W < ball['x'] < item['x'] + item_w \
           and item['y'] - BALL_H < ball['y'] < item['y'] + item_h


def update_ball(state):
    state['ball']['x'] += state['ball']['vx']
    state['ball']['y'] += state['ball']['vy']

    # Collide with left/right wall
    if state['ball']['x'] <= 0 or state['ball']['x'] >= state['display']['width']:
        state['ball']['vx'] = - state['ball']['vx']

    # Collide with top wall
    if state['ball']['y'] <= 0:
        state['ball']['vy'] = -state['ball']['vy']

    # Collide with paddle
    if collide(state['ball'], state['paddle'], PADDLE_W, PADDLE_H):
        vx, vy = calculate_velocity(state['ball'], state['paddle']['x'], PADDLE_W)
        state['ball'].update(vx=vx, vy=vy)

    # Collide with brick
    for n, brick in enumerate(state['bricks']):
        if collide(state['ball'], brick, BRICK_W, BRICK_H):
            vx, vy = calculate_velocity(state['ball'], brick['x'], BRICK_W)
            state['ball'].update(vx=vx, vy=vy)
            state['bricks'].pop(n)

    return state


def controller(state):
    if state['status'] == GAME_NOT_STARTED and state['joystick']['clicked']:
        state = get_initial_game_state(state)
    elif state['status'] == GAME_ACTIVE:
        state['paddle'] = update_paddle(state['paddle'], state['joystick'],
                                        state['display']['width'])
        state = update_ball(state)
    return state

And it seems to be wroking:

So now the last part, we should show “Game Over” when ball hits the bottom wall or when all bricks destroyed, and then start game again if user clicks joystick:

def is_game_over(state):
    return not state['bricks'] or state['ball']['y'] > state['display']['height']


def controller(state):
    if state['status'] in (GAME_NOT_STARTED, GAME_OVER)\
            and state['joystick']['clicked']:
        state = get_initial_game_state(state)
    elif state['status'] == GAME_ACTIVE:
        state['paddle'] = update_paddle(state['paddle'], state['joystick'],
                                        state['display']['width'])
        state = update_ball(state)
        if is_game_over(state):
            state['status'] = GAME_OVER
    return state

And it works too:

Performance so bad because drawing pixel on the screen is relatively time consuming operation, and we can easily fix performance by just decreasing count of bricks:

BRICK_W = 12
BRICK_H = 6
BRICK_BORDER = 4
BRICK_ROWS = 3

And now it’s smooth:

Source code.

Building simple interpreter in ClojureScript


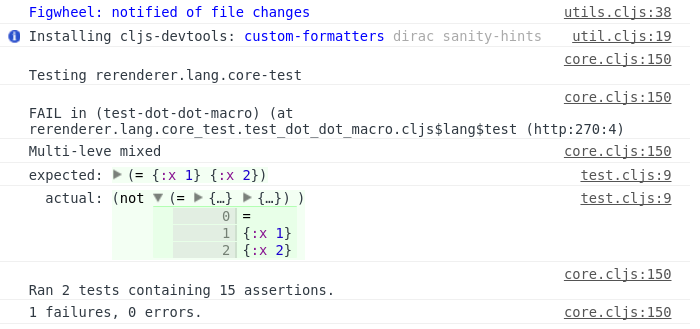
In rerenderer I need an intermediate language that can be interpreted in browser and on Android. For browser part I chose ClojureScript. Quick note about the language, it’s an EDSL on Clojure macros, for example:

(let [event (r/new Event "click")
      canvas (r/.. document (createElement "canvas"))
      width (r/.. window -innerWidth)]
  (r/set! (r/.. canvas -width) width)
  (r/.. canvas (dispatchEvent event)))

It contains only .., set! and new macros. It’s very similar to Clojure interop with java and ClojureScript interop with JavaScript. This code is an equivalent of JavaScript code:

var event = new Event("click");
var canvas = document.createElement("canvas");
var width = window.innerWidth;
canvas.width = width;
canvas.dispatchEvent(event):

And macros are just an user friendly facade, inside it produces something like bytecode:

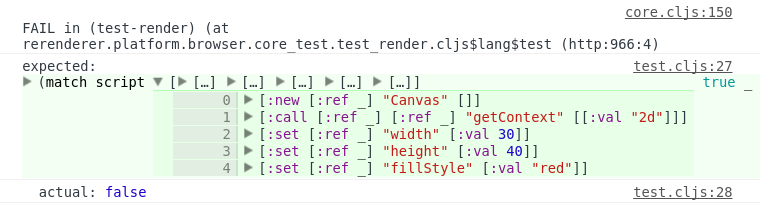
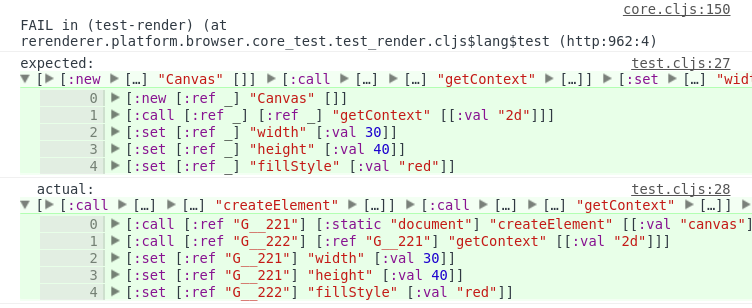
[[:new [:ref "a"] [:static "Event"] [[:val "click"]]]
 [:call [:ref "b"] [:static "document"] "createElement" [[:val "canvas"]]]
 [:get [:ref "c"] [:static "window"] "innerWidth"]
 [:set [:ref "b"] "width" [:ref "c"]]
 [:call [:ref "d"] [:ref "b"] "dispatchEvent" [[:ref "a"]]]]

We’ll write interpreter for it. You can notice that bytecode has four instructions:

  • [:new <result-var> <class-var> [<arguments-vars>]] – creates new object;
  • [:get <result-var> <object-var> <attribute>] – gets attribute of object;
  • [:set <object-var> <attribute> <value-var>] – sets attribute of object;
  • [:call <result-var> <object-var> <method> [<arguments-vars>]] – calls object method.

And also bytecode has one utility instruction:

  • [:free <object-var>] – removes reference from registry.

Variable can be in three forms:

  • [:val <value>] – value of primitive type, like double, string or bool, aka pass by value;
  • [:static <value>] – value from global scope, like window or document, similar to pass by reference;
  • [:ref <reference>] – reference to value in registry, aka pass by reference.

So, let’s start with variables and implement function that returns variable value, there we’ll use match macro from core.match:

(defn extract-var
  [registry var]
  (match var
    [:static x] (aget js/window x)  ; variable from global scope, from `window`
    [:ref x] (registry x)  ; variable from registry
    [:val x] x))  ; value

It’s simple, now it’s time to functions that’ll handle instructions. All that functions should have signature like (registry, *instruction-params) -> registry. We start with function that’ll handle :new:

(defn create-instance
  [registry [_ ref-id] cls args]
  (let [cls (extract-var registry cls)
        js-args (clj->js (into [nil] (map #(extract-var registry %) args)))
        constructor (.. js/Function -prototype -bind (apply cls js-args))
        inst (new constructor)]
    (assoc registry ref-id inst)))

So it’s just creating new instance of cls with args and puts result to registry. You can notice obscure:

js-args (clj->js (into [nil] (map #(extract-var registry %) args)))
constructor (.. js/Function -prototype -bind (apply cls js-args))
inst (new constructor)

We need this because we can’t use apply with new, like (apply new cls args) and also not all constructors have apply method, so we can’t just call (new (.apply cls js-args)). Interop isn’t nice here and this code is an equivalent of JavaScript:

new Function.prototype.bind.apply(cls, [null].concat(args))

Next is a function, that’ll handle :set, it’s very simple, we just use aset:

(defn set-attr
  [registry obj attr value]
  (aset (extract-var registry obj) attr (extract-var registry value))
  registry)

And similar for :get with aget:

(defn get-attr
  [registry [_ result-ref] ref attr]
  (assoc registry result-ref (aget (extract-var registry ref) attr)))

Function for :call is a bit more complicated:

(defn call-method
  [registry [_ result-ref] var method args]
  (let [obj (extract-var registry var)
        js-args (clj->js (mapv #(extract-var registry %) args))
        call-result (.apply (aget obj method) obj js-args)]
    (assoc registry result-ref call-result)))

We need the obscure part with .apply here, because not all JavaScript functions can be called with ClojureScript’s apply.

Functions for :free is the easiest:

(defn free
  [registry [_ ref]]
  (dissoc registry ref))

So now it’s time to write function, that can handle all instructions, it should have signature like (registry, instruction) -> registry. And it’s very easy to write it with match:

(defn interpret-instruction
  [registry instruction]
  (try
    (match instruction
      [:new result-var cls args] (create-instance registry result-var cls args)
      [:set var attr value] (set-attr registry var attr value)
      [:get result-var var attr] (get-attr registry result-var var attr)
      [:call result-var var method args] (call-method registry result-var var
                                                      method args)
      [:free var] (free registry var))
    (catch js/Error e
      (.warn js/console "Can't execute instruction" instruction ":" e)
      (throw e))))

So now we can interperete instructions one by one, and interpret script with reduce:

(reduce interpret-instruction {} script)

But we forgot about one significant part. How we handle references registry? It’ll be just atom with hash-map:

(def registry-cache (atom {}))

And function, that interpret script and update registry will be just:

(defn interpret!
  [script]
  (swap! registry-cache #(reduce interpret-instruction % script)))

You can try bytecode interpreter in action:

(new window)

Full code of interpreter.

Make youtube video look like a gif


Sometimes I need to insert youtube video looped, without sound and without controls, basically it should work like a gif. I’ve tried imgur video to gif, but it limited to 15 seconds video and a bit buggy (need to use http link instead of https).

And I thought that it would be easier to just insert youtube player without controls and info, and use IFrame API for looping (loop param works only with flash player) and muting.

So we need to insert IFrame API script and our script:

<script src="//www.youtube.com/iframe_api"></script>
<script>
    function onYouTubeIframeAPIReady() {  // called automatically when IFrame API loaded
        [].forEach.call(document.querySelectorAll('.gifify'), function(el) {
            var player = new YT.Player(el, {
                events: {
                    'onReady': function() {
                        player.mute();
                        player.playVideo();
                    },
                    'onStateChange': function(state) {
                        if (state.data === 0) {  // video ended
                            player.seekTo({seconds: 0});
                            player.playVideo();
                        }
                    }
                }
            });
        });
    }
</script>

And then insert video with ?enablejsapi=1&showinfo=0&controls=0 params and gifify class, like:

<iframe class="gifify" src="https://www.youtube.com/embed/4YKx9z6j1aA?enablejsapi=1&showinfo=0&controls=0" frameborder="0"></iframe>

In action:

Fuzzy assertions with cljs.test and core.match


Sometimes I need to test content of a big structure, where not all content meaningful, so I need something like fuzzy assertions. And I use core.match for that, like:

(ns example.test
  (:require [cljs.test :refer-macros [deftest is]]
            [cljs.core.match :refer-macros [match]]
            [example.core :refer [get-script]]))

(deftest test-render
  (let [script (get-script)]
    (is (match script
          [[:new [:ref _] "Canvas" []]
           [:call [:ref _] [:ref _] "getContext" [[:val "2d"]]]
           [:set [:ref _] "width" [:val 30]]
           [:set [:ref _] "height" [:val 40]]
           [:set [:ref _] "fillStyle" [:val "red"]]] true
          _ false))))

But it’s redundant, and failure messages are a bit ugly and it doesn’t even show content of not matched structure:

That can be easily fixed, because cljs.test is very extendable. So we just need to create macros for simpler matching and implement assert-expr method for it:

(ns example.test-utils
  (:require [cljs.core.match :refer [match]]
            [cljs.test :refer [assert-expr]]))

(defmacro match?
  [x pattern]
  `(match ~x
     ~pattern true
     _# false))

(defmethod assert-expr 'match? [_ msg form]
  (let [[_ x pattern] form]
    `(if ~form
       (cljs.test/do-report {:type :pass
                             :message ~msg
                             :expected '~form
                             :actual nil})
       (cljs.test/do-report {:type :fail
                             :message ~msg
                             :expected '~pattern
                             :actual ~x}))))

Then update test:

(ns example.test
  (:require [cljs.test :refer-macros [deftest is]]
            [example.test :refer-macros [match?]]
            [example.core :refer [get-script]]))

(deftest test-render
  (let [script (get-script)]
    (is (match? script
          [[:new [:ref _] "Canvas" []]
           [:call [:ref _] [:ref _] "getContext" [[:val "2d"]]]
           [:set [:ref _] "width" [:val 30]]
           [:set [:ref _] "height" [:val 40]]
           [:set [:ref _] "fillStyle" [:val "red"]]]))))

After that failure message will be much nicer:

Bonnie Eisenman: Learning React Native


book cover white Lately I’m working a lot with React, and mobile development looks interesting to me. So I decided to read something about React Native and chosen Learning React Native by Bonnie Eisenman. It’s a short book, mostly in tutorial format. Explains differences with React and platform specific things.

But the book have a few downsides, there’s too much screenshots of XCode and app stores, book mostly written for OS X users and contains not so much info for Android development.

Sums up everything, it seems to be a nice introductory book.

Better ClojureScript tests output with Chrome and cljs-devtools


For testing ClojureScript code I use cljs.test with figwheel. It’s very cool, tests runs when every .cljs file changed, but frequently output in DevTools is a mess. And it would be nice to have highlighted code in expected/actual part.

Then I found a nice lib – cljs-devtools. For using it you need to add it to your project and configure Chrome DevTools.

It’s nice, but it doesn’t work with print/println, only with console.log. And only when clojure data structures passed to console.log. cljs.test uses print and formatters for printing expected/actual. So we need to hack cljs.test a bit. Assume your test runner looks like:

(ns ^:figwheel-always rerenderer.test
  (:require [cljs.test :refer-macros [run-all-tests]]))

(enable-console-print!)
(run-all-tests #"rerenderer\..*-test")

And we need to redefine cljs/test.print-comparison:

(ns ^:figwheel-always rerenderer.test
  (:require [cljs.test :refer-macros [run-all-tests] :as test]
            [devtools.core :as devtools]))

(enable-console-print!)
(devtools/install!)

(defn print-comparison
  [{:keys [expected actual]}]
  (.log js/console "expected:" expected)
  (.log js/console "  actual:" actual))

(with-redefs [test/print-comparison print-comparison]
  (run-all-tests #"rerenderer\..*-test"))

And that’s all, example output:

Andreas Oehlke: Learning LibGDX Game Development


book cover I’m a bit interested in game development and LibGDX seems to be a good framework, so I read Learning LibGDX Game Development by Andreas Oehlke. I’ve planned to read about best practices, edge cases and how it works inside. And it’s not that kind of book. It’s just an entry level tutorial with a lot of printed code.

But the author described development of a little game touching almost all LibGDX parts. So maybe it’s a nice tutorial for newcomers.

Michael L. Scott: Programming Language Pragmatics


book cover Yesterday I’ve finished reading Programming Language Pragmatics by Michael L. Scott and it’s a big book with a lot of exercises (I’ve tried to do most of them) and with a ton of additional material on PLP CD. This book covers most of PL related concepts from grammar to concurrency and memory management. Also it explains why something implemented the way it implemented in exists programming languages. And has information about ton of languages, from Algol to Haskell.

But some chapters is outdated, for example chapter about in-browser scripting. And some chapters covers not all aspects, it’s like 50 pages about mutexes and locks and only 2 pages about message passing in chapter about concurrency.

Despite this, I guess it’s must read book for software developers.

Talking with Hubot through Google Glass


For home automation I use Hubot, it’s something like a framework for creating chat bots, it’s very easy to use and rules for it can be written in CoffeeScript, like:

robot.hear /pause move/i, (res) ->
  exec 'player pause'
  res.send 'Sure!'

So I planned to create an app for phone, which would allow me to say “Ok Google, Hubot, next song”, or something similar. But it’s not possible, Android API not allow to create custom voice actions like “Hubot”, only commands from predefined list allowed.

But I remembered that I have useless Google Glass, which GDK API allows to create custom “Ok Glass” commands, like “Ok Glass, Hubot, next song”, at least in development mode with:

<uses-permission android:name="com.google.android.glass.permission.DEVELOPMENT" />

First of all I created Hubot adapter which support something like polling with simple API:

  • POST /polling/subscribe/ with {} respond s{user: user} – subscribe to polling;
  • POST /polling/message/ with {user: user, text: message-text} responds {ok: ok} – send message to bot;
  • GET /polling/response/:user/ responds {responses: [response]} – get unread bot responses.

It’s not so interesting, written in CoffeeScript (Hubot requires it), code is very simple.

For Glass part I’ve used Kotlin with a few nice libraries:

And it’s very great combination, with them making http request is much nicer than with java and just DefaultHttpClient, like:

Fuel.post("$url/polling/message/")
    .body(jsonObject("user" to user, "text" to text).toString())
    .header("Content-Type" to "application/json")
    .jsonPromise()
    .success { info("Message $text sent") }
    .fail { warn("Can't send message $text because $it") }

Just promises in comparison with Clojure core.async and Scala Akka it’s a bit way back, it’s like writing in pre ES7 JavaScript. So why Kotlin? It’s simpler to use on Android, struggling with dex errors with Scala isn’t fun. Performance is similar to apps written in Java, sometimes startup time of Clojure apps is annoying. And there’s far less magic then in Scala scaloid and Clojure Neko.

In action:

Sources on github.