Import python modules straight from github


In Go we have ability to import modules from github, like:

import "github.com/parnurzeal/gorequest"

It’s a bit controversial feature, but sometimes it’s useful. And I was interested, is it possible to implement something like that in python. TLDR it’s possible with import_from_github_com package:

from github_com.kennethreitz import requests

assert requests.get('https://github.com').status_code == 200

So, how it works, according to PEP-0302 we have special sys.meta_path with importer objects and every importer should implement finder protocol with find_module(module_name: str, package_path: [str]) -> Loader|None. Now we need to implement finder that handles modules, which path starts with github_com, like:

class GithubComFinder:
    def find_module(self, module_name, package_path):
        if module_name.startswith('github_com'):
            return GithubComLoader()
            
sys.meta_path.append(GithubComFinder())

And now we need GithubComLoader that implements loader protocol with load_module(fullname: str) -> None, I’ll skip private methods of the loader here, they’re straightforward and not interesting in context of the article:

class GithubComLoader:
    def load_module(self, fullname):
        if self._is_repository_path(fullname):
            self._install_module(fullname)

        if self._is_intermediate_path(fullname):
            module = IntermediateModule(fullname)
        else:
            module = self._import_module(fullname)

        sys.modules[fullname] = module

So what’s IntermediateModule, it’s a dummy module/package for paths like github_com.nvbn, it’s used only in intermediate steps and shouldn’t be used by end user. Installation happens in _install_module method, it just calls pip with git url, like:

import pip

pip.main(['install', 'git+https://github.com/kennethreitz/requests'])

All looks very simple, let’s try it in action:

>>> from github_com.kennethreitz import requests
Collecting git+https://github.com/kennethreitz/requests
  Cloning https://github.com/kennethreitz/requests to /tmp/pip-8yyvh7kr-build
Installing collected packages: requests
  Running setup.py install for requests
Successfully installed requests-2.9.1
>>> requests.get('https://github.com').status_code
200

Sources on github.

Three months in Bali, Indonesia


Rice field nearby my house

From September to December I was in Indonesia, most of the time I was living in Ubud (Bali), but also was in Jakarta, Kuta (Bali) and Gili Trawangan.

I was entering Indonesia by VOA, it allowed me to be in the country for 30 days. So every month I was going to a third country, visited Kuala Lumpur (Malaysia), Bangkok (Thailand) and Singapore.

So in Ubud I was renting part of a house with kitchen, A/C, hot water, pool (shared between 6 houses) and 8 MBit/s internet. With all bills it costs 3000000 IDR ($216). The house was beside nice rice fields, but a bit far from shops, beaches and attractions. So I was renting motorbike (Honda Scoopy) for 600000 IDR ($43).

Back to internet, it worked well in dry season, but very bed in wet season. It wasn’t working for an hour after every thunderstorm, and in some days it was like five thunderstorms. So as a backup I’ve used mobile internet by Telkomsel simPATI and paid 160000 IDR ($11) for 6GB. I’ve used 3G, but heard that now LTE available.

In Bali it’s cheaper to buy prepared food on night markets. It costs 150000-200000 IDR ($10-15) for week of eating three times a days local food like nasi/mi goreng, satay and etc. But I guess it’s not healthy, so mostly I cooked by myself from ingredients from supermarket. So with every day meat/fish/seafood it was 300000-500000 IDR ($20-35) for week.

Alcohol is a bit expensive, like 20000-30000 IDR ($1.5-2) for a can of local beer and 70000-120000 IDR ($5-8) for a bottle of local rice vodka (arac).

Tons of articles already written about Bali’s attractions, so I just mention that some beaches, waterfalls and temples are quite nice here.

How The Fuck works


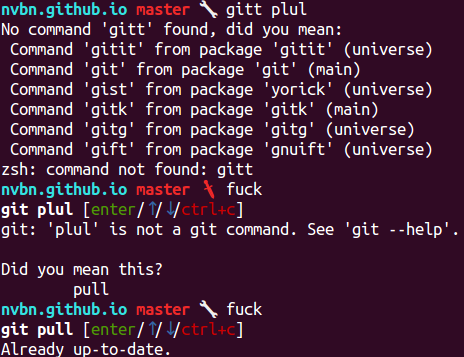
Not so long ago I introduced an useful app The Fuck that fixes the previous console command. It was downloaded thousands times, got tons of stars on github, had tens of great contributors. And it’s interesting inside.

Also about a week ago I discussed about The Architecture of Open Source Applications books. And now I think it’ll be cool to write something like a chapter in the book, but about The Fuck.

Pipeline

The simplest abstraction for describing the app is a pipeline, from the user side it looks like just:

graph LR A[Something goes wrong]-->B[fuck] B-->C[All cool]

It’s that simple because fuck (or whatever user uses) is an alias, it does some magic for getting the broken command, executing fixed command and updating the history. For example for zsh it looks like:

TF_ALIAS=fuck alias fuck='eval $(thefuck $(fc -ln -1 | tail -n 1)); fc -R'

Back to pipeline, for thefuck that runs inside the alias it’ll be:

graph LR A[Broken command]-->B[thefuck] B-->C[Fixed command]

And all interesting stuff happens inside of thefuck:

graph TB A[Broken command]-->B[Matched rules] B-->C[Corrected commands] C-->|User selects one|D[Fixed command]

Most significant part here is matching rules, rule is a special modules with two functions:

  • match(command: Command) -> bool – should return True when rule matched;
  • get_new_command(command: Command) -> str|list[str] – should return fixed command or list of fixed commands.

I guess the app is cool only because of the rules. And it’s very simple to write your own and now 75 rules available, written mostly by third party contributors.

Command is a special data structure that works almost like namedtuple Command(script: str, stdout: str, stderr: str) where script is a shell-agnostic version of broken command.

Shell specific

All shells have different ways to describe aliases, different syntax (like and instead of && in fish) and different ways to work with history. And even it depends on shell configs (.bashrc, .zshrc, etc). For avoiding all this stuff a special shells module converts shell specific command to sh compatible version, expands aliases and environment variables.

So for obtaining mentioned in the previous section Command instance we using special shells.from_shell function, run result in sh, and obtain stdout and stderr:

graph TB A[Broken command]-->|from_shell|B[Shell agnostic command] B-->|Run in sh|C[Command instance]

And also we making some similar step with fixed command – convert shell agnostic command to shell specific with shells.to_shell.

Settings

The Fuck is very configurable app, user can enable/disable rules, configure ui, set rules specific options and etc. As a config app uses special ~/.thefuck/settings.py module and environment variables:

graph TB A[Default settings]-->B[Updated from settings.py] B-->C[Updated from env]

Originally settings object was passed to every place where it was needed as an argument, it was cool and testable, but too much boilerplate. Now it’s a singleton and works like django.conf.settings (thefuck.conf.settings).

UI

UI part of The Fuck is very simple, it allows to chose from variants of corrected commands with arrows, approve selection with Enter or dismiss it with Ctrl+C.

Downfall here is that there’s no function in Python standard library for reading key on non-windows and without curses. And we can’t use curses here because of alias specifics. But it’s easy to write clone of windows-specific msvrt.getch:

import tty
import termios


def getch():
    fd = sys.stdin.fileno()
    old = termios.tcgetattr(fd)
    try:
        tty.setraw(fd)
        ch = sys.stdin.read(1)
        if ch == '\x03':  # For compatibility with msvcrt.getch
            raise KeyboardInterrupt
        return ch
    finally:
        termios.tcsetattr(fd, termios.TCSADRAIN, old)

Also UI requires properly sorted list of corrected commands, so all rules should be matched before and it can took a long time. But with simple heuristic it works well, first of all we match rules in order of it’s priority. So the first corrected command returned by the first matched rule is definitely the command with max priority. And app matches other rules only when user presses arrow keys for selecting another. So for most use cases it work’s fast.

In wide

If we look to the app in wide, it’s very simple:

graph TB A[Controller]-->E[Settings] A-->B[Shells] A-->C[Corrector] C-->D[Rules] C-->E D-->E A-->F[UI]

Where controller is an entry point, that used when user use thefuck broken-command. It initialises settings, prepares command from/to shell with shells, gets corrected commands from corrector and selects one with UI.

Corrector matches all enabled rules against current command and returns all available corrected variants.

About UI, settings and rules you can read above.

Testing

Tests is one of the most important parts of any software project, without them it’ll fall apart on every change. For unit tests here’s used pytest. Because of rules there’s a lot of tests for matching and checking corrected command, so parametrized tests is very useful, typical test looks like:

import pytest
from thefuck.rules.cd_mkdir import match, get_new_command
from tests.utils import Command


@pytest.mark.parametrize('command', [
    Command(script='cd foo', stderr='cd: foo: No such file or directory'),
    Command(script='cd foo/bar/baz',
            stderr='cd: foo: No such file or directory'),
    Command(script='cd foo/bar/baz', stderr='cd: can\'t cd to foo/bar/baz')])
def test_match(command):
    assert match(command)

Also The Fuck works with various amount of shells and every shell requires specific aliases. And for testing that all works we need functional tests, there’s used my pytest-docker-pexpect, that run’s special scenarios with every supported shell inside docker containers.

Distribution

The most problematic part of The Fuck is installation of it by users. The app distributed with pip and we had a few problems:

  • some dependencies on some platforms needs python headers (python-dev), so we need to tell users manually install it;
  • pip doesn’t support post-install hooks, so users need to manually configure an alias;
  • some users uses non-supported python versions, only 2.7 and 3.3+ supported;
  • some old versions of pip doesn’t install any dependency at all;
  • some versions of pip ignores python version dependent dependencies, we need pathlib only for python older than 3.4;
  • that’s funny, but someone was pissed off because of the name and tried to remove package from pypi.

Most of this problems was fixed by using special install script, it uses pip inside, but prepares system before installation and configures an alias after.

py.test plugin for functional testing with Docker


It’s very useful to run functional tests in a clean environment, like a fresh Docker container, and I wrote about this before, and now it was formalized in a simple py.test plugin — pytest-docker-pexpect.

It provides few useful fixtures:

  • spawnupexpect.spawnu object attached to a container, it can be used to interact with apps inside the container, read more;
  • TIMEOUT – a special object, that can be used in assertions those checks output;
  • run_without_docker – indicates that tests running without Docker, when py.test called with --run-without-docker.

And some marks:

  • skip_without_docker – skips test when without Docker;
  • once_without_docker – runs parametrized test only with a first set of params when without Docker.

It’s easier to show it in examples. So, first of all, just test some app --version argument inside an Ubuntu container:

import pytest


@pytest.fixture
def ubuntu(spawnu):
    # Get `spawnu` attached to ubuntu container with installed python and
    # where bash ran
    proc = spawnu(u'example/ubuntu',
                  u'''FROM ubuntu:latest
                      RUN apt-get update
                      RUN apt-get install python python-dev python-pip''',
                  u'bash')
    # Sources root is available in `/src`
    proc.sendline(u'pip install /src')
    return proc


def test_version(ubuntu, TIMEOUT):
    ubuntu.sendline(u'app --version')
    # Asserts that `The App 2.9.1` came before timeout,
    # when timeout came first, `expect` returns 0, when app version - 1
    assert ubuntu.expect([TIMEOUT, u'The App 2.9.1'])

Looks simple. But sometimes we need to run tests in different environments, for example — with different Python versions. It can be easily done by just changing ubuntu fixture:

@pytest.fixture(params=[2, 3])
def ubuntu(request, spawnu):
    python_version = request.param
    # Get `spawnu` attached to ubuntu container with installed python and
    # where bash ran
    dockerfile = u'''
        FROM ubuntu:latest
        RUN apt-get update
        RUN apt-get install python{version} python{version}-dev python{version}-pip
    '''.format(version=python_version)
    proc = spawnu(u'example/ubuntu', dockerfile, u'bash')
    # Your source root is available in `/src`
    proc.sendline(u'pip{} install /src'.format(python_version))
    return proc

And sometimes we need to run tests in Docker-less environment, for example — in Travis CI container-based infrastructure. So here’s where --run-without-docker argument comes handy. But we don’t need to run tests for more than one environment in a single Travis CI run, and we don’t need to make some installation steps. So there’s place for once_without_docker mark and run_without_docker fixture, test with them will be:

import pytest


@pytest.fixture(params=[2, 3])
def ubuntu(request, spawnu, run_without_docker):
    python_version = request.param
    # Get `spawnu` attached to ubuntu container with installed python and
    # where bash ran
    dockerfile = u'''
        FROM ubuntu:latest
        RUN apt-get update
        RUN apt-get install python{version} python{version}-dev python{version}-pip
    '''.format(version=python_version)
    proc = spawnu(u'example/ubuntu', dockerfile, u'bash')
    # It's already installed if we run without Docker:
    if not run_without_docker:
        # Your source root is available in `/src`
        proc.sendline(u'pip{} install /src'.format(python_version))
    return proc


@pytest.mark.once_without_docker
def test_version(ubuntu, TIMEOUT):
    ubuntu.sendline(u'app --version')
    # Asserts that `The App 2.9.1` came before timeout,
    # when timeout came first, `expect` returns 0, when app version - 1
    assert ubuntu.expect([TIMEOUT, u'The App 2.9.1'])

Another often requirement — skip some tests without docker, some destructive tests. It can be done with skip_without_docker mark:

@pytest.mark.skip_without_docker
def test_broke_config(ubuntu, TIMEOUT):
    ubuntu.sendline(u'{invalid} > ~/.app/config.json')
    ubuntu.sendline(u'app')
    assert ubuntu.expect([TIMEOUT, u'Config was broken!'])

Source code of the plugin.

From Shadow Canvas to Shadow Script


Not so long ago I’d introduced a concept of Shadow Canvas that was used in rerenderer. Basically it was just a mechanism, that remembers all actions performed to a canvas, and applies it on browser or android canvas, if the sequence of actions changed. Like Shadow DOM from React.

But it was very limited, supported only calls and attributes changes, so it wasn’t possible to render something on offscreen canvas or load some bitmap and draw. So I rethought and came up with a concept of Shadow Script, it’s a simple DSL, that has only a few constructions:

; Create instance of `cls` with `args` (list of values or vars) and put result in
; variables hash-map with key `result-var`:
[:new result-var cls args]
; Change `var` attribute `attr` to `value` (can be variable):
[:set var attr value]
; Put value of `var` attribute `attr` in variables hash-map with key `result-var`:
[:get result-var var attr]
; Call method `method` of `var` with `args` (list of values or vars) and put result in
; variables hash-map with key `result-var`:
[:call result-var var method args]

It will be painful to write this constructions manually, so I implemented new, .. and set! macros. So code looks like an ordinary Clojure code. For example — a code for drawing a red rectangle:

(let [canvas (new Canvas)
      context (.. canvas (getContext "2d"))]
  (set! (.. canvas -width) 200)    
  (set! (.. canvas -height) 200)
  (set! (.. context -fillStyle) "red")
  (.. context (fillRect 0 0 100 100))) 

Will be translated to:

[[:new "G_01" :Canvas []]
 [:call "G_02" "G_01" "getContext" ["2d"]]
 [:set "G_01" "width" 200]
 [:set "G_01" "height" 200]
 [:set "G_02" "fillStyle" "red"]
 [:call "G_03" "G_02" "fillRect" [0 0 100 100]]]

(open on a new page)

A huge benefit of Shadow Script, is that an interpreter can be build very easily, and this is significant, because we need to implement interpreter three or more times: for browsers in ClojureScript, for Android in Java (or Kotlin?) and for iOS in Objective-C (or Swift). And interpreter in ClojureScript is basically just:

(defn interprete-line
  "Interpretes a single `line` of script and returns changed `vars`."
  [vars line]
  (match line
    [:new result-var cls args] (create-instance vars result-var cls args)
    [:set var attr value] (set-attr vars var attr value)
    [:get result-var var attr] (get-attr vars result-var var attr)
    [:call result-var var method args] (call-method vars result-var var
                                                    method args)))

(defn interprete
  "Interpretes `script` and returns hash-map with vars."
  [script]
  (reduce interprete-line {} script))

(full code)

Another cool stuff is that we can construct a dependencies tree and recreate only changed canvases/bitmaps/etc. So, for example we need to draw a red rectangle on another rectangle, which color stored in a state:

(defn draw-box
  [color w h]
  (let [canvas (new Canvas)
        context (.. canvas (getContext "2d"))]
    (set! (.. canvas -width) w)
    (set! (.. canvas -height) h)
    (set! (.. context -fillStyle) color)
    (.. context (fillRect 0 0 w h))
    canvas))

(let [red-box (draw-box "red" 50 50)
      another-box (draw-box (:color state) 800 600)
      another-box-ctx (.. another-box (getContext "2d"))]
  (.. another-box-ctx (drawImage red-box 50 50)))

With state {:color "yellow"} script we’ll be:

[[:new "G_01" :Canvas []]
 [:call "G_02" "G_01" "getContext" ["2d"]]
 [:set "G_01" "width" 50]
 [:set "G_01" "height" 50]
 [:set "G_02" "fillStyle" "red"]
 [:call "G_03" "G_02" "fillRect" [0 0 50 50]]
 [:new "G_04" :Canvas []]
 [:call "G_05" "G_04" "getContext" ["2d"]]
 [:set "G_04" "width" 800]
 [:set "G_04" "height" 600]
 [:set "G_05" "fillStyle" "yellow"]
 [:call "G_06" "G_05" "fillRect" [0 0 800 600]]
 [:call "G_07" "G_04" "getContext" ["2d"]]
 [:call "G_08" "G_07" "drawImage" ["G_01" 50 50]]]

(open on a new page)

And with state {:color "green"}:

[[:new "G_01" :Canvas []]
 [:call "G_02" "G_01" "getContext" ["2d"]]
 [:set "G_01" "width" 50]
 [:set "G_01" "height" 50]
 [:set "G_02" "fillStyle" "red"]
 [:call "G_03" "G_02" "fillRect" [0 0 50 50]]
 [:new "G_04" :Canvas []]
 [:call "G_05" "G_04" "getContext" ["2d"]]
 [:set "G_04" "width" 800]
 [:set "G_04" "height" 600]
 [:set "G_05" "fillStyle" "green"]
 [:call "G_06" "G_05" "fillRect" [0 0 800 600]]
 [:call "G_07" "G_04" "getContext" ["2d"]]
 [:call "G_08" "G_07" "drawImage" ["G_01" 50 50]]]

(open on a new page)

You can see that canvas G_01 wasn’t changed, and all lines before [:new "G_04" :Canvas []] can be skipped. This sounds cool, but it’s a bit complex, so it’s not yet implemented.

Gist with examples.

Functional testing of console apps with Docker


For one of my apps I’d been manually testing some basic functions in a bunch of environments, and it was a huge pain. So I decided to automatize it. As a simplest solution I chose to run an environment in Docker and interact with them through pexpect.

First of all I tried to use docker-py, but it’s almost impossible to interact with app run in Docker container, started from docker-py with pexpect. So I just used Docker binary:

from contextlib import contextmanager
import subprocess
import shutil
from tempfile import mkdtemp
from pathlib import Path
import sys
import pexpect

# Absolute path to your source root:
root = str(Path(__file__).parent.parent.parent.resolve())


def _build_container(tag, dockerfile):
    """Creates a temporary folder with Dockerfile, builds an image and
    removes the folder.
    
    """
    tmpdir = mkdtemp()
    with Path(tmpdir).joinpath('Dockerfile').open('w') as file:
        file.write(dockerfile)
    if subprocess.call(['docker', 'build', '--tag={}'.format(tag), tmpdir],
                       cwd=root) != 0:
        raise Exception("Can't build a container")
    shutil.rmtree(tmpdir)


@contextmanager
def spawn(tag, dockerfile, cmd):
    """Yields spawn object for `cmd` ran inside a Docker container with an
    image build with `tag` and `dockerfile`. Source root is available in `/src`.
    
    """
    _build_container(tag, dockerfile)
    proc = pexpect.spawnu('docker run --volume {}:/src --tty=true '
                          '--interactive=true {} {}'.format(root, tag, cmd))
    proc.logfile = sys.stdout

    try:
        yield proc
    finally:
        proc.terminate()

_build_container is a bit tricky, but it’s because Docker binary can build an image only for file named Dockerfile.

This code can be used for running something inside a Docker container very simple, code for printing content of your source root inside the container will be:

with spawn(u'ubuntu-test', u'FROM ubuntu:latest', u'bash') as proc:
    proc.sendline(u'ls /src')

Back to testing, if we want to test that some application can print version, you can easily write py.test test like this:

container = (u'ubuntu-python', u'''
FROM ubuntu:latest
RUN apt-get update
RUN apt-get install -yy python
''')


def test_version():
    """Ensure that app can print current version."""
    tag, dockerfile = container
    with spawn(tag, dockerfile, u'bash') as proc:
        proc.sendline(u'cd /src')
        proc.sendline(u'pip install .')
        proc.sendline(u'app --version')
        # Checks that `version:` is in the output:
        assert proc.expect([pexpect.TIMEOUT, u'version:'])

You can notice the strange assert proc.expect([pexpect.TIMEOUT, u'version:']) construction, it works very simple, if there’s version: in output, expect returns 1, if timeout came first - 0.

Also you can notice that all strings are in unicode (u''), it’s for compatibility with Python 2. If you use only Python 3, you can remove all u''.

Examples.

Changing version of App Engine application on checkout to a git branch


It’s very common and useful to use current branch name (or something dependent on it) as a version for App Engine application. And it’s painful and error-prone to change it manually.

It’s easily can be automatized with a git hook, we just need to fill .git/hooks/post-checkout with something like:

#!/usr/bin/env python
import glob
import subprocess


def get_yaml_paths():
    """Returns all `.yaml` files where `version` can be changed."""
    for path in glob.glob('*.yaml'):
        with open(path) as yml:
            content = yml.read()
            if 'version:' in content:
                yield path


def get_version():
    """Returns `version`, currently just current branch."""
    proc = subprocess.Popen(['git', 'rev-parse', '--abbrev-ref', 'HEAD'],
                            stdout=subprocess.PIPE)
    return proc.stdout.read()


def replace_version(path, new_version):
    with open(path, 'r') as yml:
        lines = yml.readlines()
    with open(path, 'w') as yml:
        for line in lines:
            if line.startswith('version'):
                yml.write('version: {}\n'.format(new_version))
            else:
                yml.write(line)


version = get_version()
print("Change version in yaml files to", version)
for path in get_yaml_paths():
    replace_version(path, version)

And make it executable:

chmod +x .git/hooks/post-checkout

In action:

cat app.yaml | grep "^version:"
version: fixes
➜ git checkout feature
Switched to branch 'feature'
Your branch is up-to-date with 'origin/feature'.
Change version in yaml files to feature
➜ cat app.yaml | grep "^version:"
version: feature

Leonardo Borges: Clojure Reactive Programming


book cover Recently I’ve got a few free books from PACKT and as one to read I chose Clojure Reactive Programming by Leonardo Borges. I’m already familiar with most of concepts and libs described in this book, but I guess it’s a good book. The book explains Rx extensions and usage of them from Clojure and ClojureScript, explains core.async and React (and Om), so I think it touches all aspects of “reactive” (such a buzzword). And coolest part of this book is appendix, it about library design but with functors and monads.

So summing up everything, this book is a bit for newbies, but great.

Using Werkzeug with Django on App Engine


Werkzeug has a pretty decent error page with in-browser debugger and some other features. In just Django project it can be easily used with django-extensions with:

./manage.py runserver_plus

But we can’t use this approach with gae, because it doesn’t use runserver, it just works through wsgi. So instead we should wrap our wsgi application with DebuggedApplication. So in wsgi.py (or another file where wsgi app defined) we need to change an app initialization to something like:

from django.core.wsgi import get_wsgi_application
from django.conf import settings
from werkzeug.debug import DebuggedApplication

application = get_wsgi_application()
if settings.DEBUG:
    app = DebuggedApplication(app, True)
    # Werkzeug won't work without exceptions propagation
    settings.DEBUG_PROPAGATE_EXCEPTIONS = True

And that’s all.

Searching for a cheap flight ticket with Clojure and Chrome


Few days ago I had to find a cheap flight ticket. And all services that I know allows to search only for selected day, but I needed for a month. It’s a pain to select every day, search and manually choose a best deal. So I decided to automate it.

As I know all services uses tons of client-side code for searching and some times asks to type a captcha, so simplest solution is to write an extension from Chrome. As an enemy I selected Yandex Avia, because I just used to it, but It’s not so important, approach used in the article can be used with other services.

First of all, let’s create main function for searching:

(defn run
  [id-from id-to date-from date-to]
  (->> (days-range date-from date-to)
       (map #(get-flights id-from id-to %))
       concat-flights
       present))

Where’s id-from and id-to are airports ids, date-from and date-to are date range for searching. Code looks very straightforward, we just creates a date range, gets flights, concats results and presents it. Now we need to implement each function from this pipeline.

days-range isn’t interesting, so let’s start with get-flights. In this function we should open a tab with special url, get results from it and close the tab. So start with opening a tab with chrome.tabs.create:

(defn open-tab
  [url]
  (let [done (chan)]
    (.. js/chrome -tabs (create #js {:url url}
                                #(go (>! done %))))
    done))

This action is asynchronously, so we use core.async here.

So now let’s look to most complicated part – parsing. That part works on the background’s side and on the content side (on the service’s web app pages). Background side is a bit complicated: we should send a script to content with chrome.tabs.executeScript and wait for a message with result using chrome.runtime.onMessage.addListener, but it can be implemented very simple:

; Map of tab-id => chan
(def waiting (atom {}))

; Puts received message to the waiting channel
(.. js/chrome -runtime -onMessage (addListener
                                    #(go (let [result (js->clj %1 :keywordize-keys true)
                                               {:keys [tab]} (js->clj %2 :keywordize-keys true)
                                               waiter (get @waiting (:id tab))]
                                           (>! waiter result)))))

(defn run-script
  [{:keys [id]}]
  (let [result (chan)]
    (.. js/chrome -tabs (executeScript id #js {:file "content/main.js"}))
    ; Puts channel in waiting map
    (swap! waiting assoc id result)
    result))

And content side is more than simple:

(go-loop []
  (if (ready?)
    (.. js/chrome -runtime (sendMessage #js {:status :ok
                                             :flights (clj->js (get-flights))}))
    (do (<! (timeout 500))
        (recur))))

We skip content’s get-flights and ready? here, because it’s just a parsing of html.

Back to the background’s get-flights, now we can implement it:

(defn get-flights
  [id-from id-to date]
  (go (let [search-format (formatter "dd+MMM")
            tab (<! (open-tab (make-url id-from id-to (unparse search-format date))))
            {:keys [id]} (js->clj tab :keywordize-keys true)
            {:keys [flights]} (<! (run-script tab))]
        (.. js/chrome -tabs (remove id))
        (map #(assoc % :date date) flights))))

So that hardcore action was simplified to simple and flat code.

Now we can go back to main function. We can’t just use concat for a list of channels, so we should implement something similar:

(defn concat-flights
  [flights]
  (go-loop [[flight & flights] flights
            result []]
    (if flights
      (recur flights (concat result (<! flight)))
      result)))

It works just like concat, but accepts a list of channels and returns a single channel with concatenated result.

And now the latest part – presentat, we just use console.table here, it offers us fancy table view with sorting:

(defn present
  [prices]
  (let [present-format (formatter "MM.dd")]
    (go (->> (<! prices)
             (map #(update % :date (fn [date] (unparse present-format date))))
             clj->js
             (.table js/console)))))

Now we can look to the result with flights from Saint-Petersburg (Russia) to Denpasar (Indonesia, Bali) in range from the first day of September till the first day of October:

Result

Isn’t it cool that this very complicated logic can be written as a simple flat code almost without callback, and can be simplified to just a pipeline of short actions?

Gist with the sources.