Import packages depending on Python version


While working on py-backwards and it’s setuptools integration I found an interesting problem, how to transparently allow people with different Python versions to use different packages. So, imagine we have a package with a structure:

package
  __init__.py
  _compiled_2_7
    package
      __init__.py
      main.py
  _compiled_3_3
    package
      __init__.py
      main.py
  _compiled_3_4
    package
      __init__.py
      main.py
  _compiled_3_5
    package
      __init__.py
      main.py
  _compiled_3_6
    package
      __init__.py
      main.py

And, for example, on Python 2.7 we need to use the package from _compiled_2_7, on 3.3 from _compiled_3_3 and etc.

First of all, we know that if we import package.main, package.__init__ would be imported first:

# __init__.py
print('init')

# main.py
print('main')

# REPL
>>> import package.main
init
main

>>> from package import main
init
main

# shell
 python -m package.main
init
main

So it works all the time. And now if we put special bootstrap script, which would change sys.path depending on current Python version, we can easily import the package that we need:

import sys
import os

VERSIONS = {'_compiled_2_7': (2, 7),
            '_compiled_3_0': (3, 0),
            '_compiled_3_1': (3, 1),
            '_compiled_3_2': (3, 2),
            '_compiled_3_3': (3, 3),
            '_compiled_3_4': (3, 4),
            '_compiled_3_5': (3, 5),
            '_compiled_3_6': (3, 6)}
root = os.path.abspath(os.path.dirname(__file__))


def _get_available_versions():
    for version in os.listdir(root):
        if version in VERSIONS:
            yield version


def _get_version():
    available_versions = sorted(_get_available_versions())[::-1]
    for version in available_versions:
        if VERSIONS[version] <= sys.version_info:
            return version


# We should pass `__name__` as an argument, because
# we can't access `__name__` after module deletion
def _import_module(name):
    version = _get_version()
    version_path = os.path.join(root, version)
    sys.path.insert(0, version_path)
    del sys.modules[name]
    __import__(name)


_import_module(__name__)

Let’s try it on our package, but first, we need to fill _compiled_*/package/__init__.py with:

print('init 2.7')  # replace with required version

And _compiled_*/package/main.py with:

print('main 2.7')  # replace with required version

So now we can try it with Python 2.7:

# REPL
>>> import package
init 2.7

>>> import package.main
init 2.7
main 2.7

>>> from package import main
init 2.7
main 2.7

# shell
 python2 -m package.main
init 2.7
main 2.7

And with Python 3.5:

# REPL
>>> import package
init 3.5

>>> import package.main
init 3.5
main 3.5

>>> from package import main
init 3.5
main 3.5

# shell
 python3 -m package.main
init 3.5
main 3.5

It works!

Guessing complexity of algorithms


Recently, when I was having fun with algorithms exercises, I though, do I solve them correctly? So I thought that it would be neat to somehow find the complexity of an algorithm.

Gathering the data

The first idea was to use timeit and calculate complexity based on consumed time:

import timeit
from numpy.random import randint


def _get_data_set(size):
    return list(randint(1000, size=size))


def main(alist):
    for passnum in range(len(alist) - 1, 0, -1):
        for i in range(passnum):
            if alist[i] > alist[i + 1]:
                temp = alist[i]
                alist[i] = alist[i + 1]
                alist[i + 1] = temp


for size in range(1000, 10000, 1000):
    print(size, '=>', timeit.timeit('main(xs)',
                                    f'xs = _get_data_set({size})',
                                    globals=globals()))                                 
1000 => 0.25852540601044893
2000 => 1.9087769229663536
3000 => 3.760379843064584
4000 => 5.552884255070239
5000 => 9.784064659965225
6000 => 10.014859249000438
7000 => 21.16908495896496
8000 => 19.5277360730106
9000 => 24.729382600053214

But it wasn’t much accurate and useful for small functions, required too big data set and required to run the function multiple times for acquiring meaningful data.

The second idea was to use cProfile:

from cProfile import Profile


profiler = Profile()
profiler.runcall(main, _get_data_set(1000))
profiler.print_stats()
         3 function calls in 0.269 seconds

   Ordered by: standard name

   ncalls  tottime  percall  cumtime  percall filename:lineno(function)
        1    0.269    0.269    0.269    0.269 t.py:43(main)
        1    0.000    0.000    0.000    0.000 {built-in method builtins.len}
        1    0.000    0.000    0.000    0.000 {method 'disable' of '_lsprof.Profiler' objects}

But it tracks only function calls and is useless for small algorithmic functions. So I found line_profiler line-by-line profiler:

from line_profiler import LineProfiler


profiler = LineProfiler(main)
profiler.runcall(main, _get_data_set(1000))
profiler.print_stats()
Total time: 2.21358 s
File: /home/nvbn/exp/complexity/t.py
Function: main at line 43

Line #      Hits         Time  Per Hit   % Time  Line Contents
==============================================================
    43                                           def main(alist):
    44      1000         1232      1.2      0.1      for passnum in range(len(alist) - 1, 0, -1):
    45    500499       557623      1.1     25.2          for i in range(passnum):
    46    499500       729304      1.5     32.9              if alist[i] > alist[i + 1]:
    47    243075       278005      1.1     12.6                  temp = alist[i]
    48    243075       334224      1.4     15.1                  alist[i] = alist[i + 1]
    49    243075       313194      1.3     14.1                  alist[i + 1] = temp

Which works fairly well for this task.

And as for guessing complexity we almost always need only the magnitude of growth, we can just calculate all hits, like:

def _get_hits(fn, *args, **kwargs):
    profiler = LineProfiler(fn)
    profiler.runcall(fn, *args, **kwargs)
    hits = 0
    for timing in profiler.get_stats().timings.values():
        for _, line_hits, _ in timing:
            hits += line_hits
    return hits


for size in range(100, 1000, 100):
    print(size, '=>', _get_hits(main, _get_data_set(size)))
100 => 17257
200 => 69872
300 => 159227
400 => 279847
500 => 429965
600 => 622175
700 => 852160
800 => 1130426
900 => 1418903

So to proof that it’s correct, we can visualize it with matplotlib:

import matplotlib.pyplot as plt


result = [(size, _get_hits(main, _get_data_set(size)))
          for size in range(100, 1000, 100)]

plt.style.use('ggplot')
plt.plot([size for size, _ in result],
         [hits for _, hits in result])
plt.title('Bubble sort: O(n^2)')
plt.show()

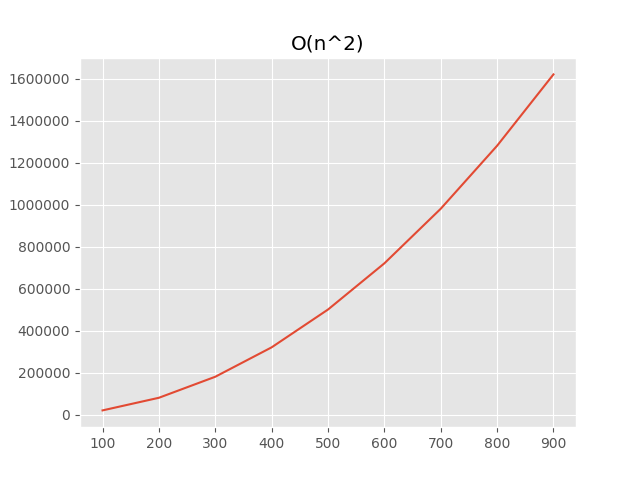
On the plot we can obviously see that the complexity is quadratic:

Bubble sort: O(n^2)

Finding complexity

For finding most the appropriate complexity, we need to have a special functions like def get_score(hits: List[Tuple[int, int]]) -> int. And a complexity with the lowest score will be the most appropriate.

Let’s start with constant complexity:

def constant(xs):
    result = 0
    for n in range(5):
        result += n
    return result
    
    
hits = [(size, _get_hits(constant, _get_data_set(size)))
        for size in range(100, 1000, 100)]
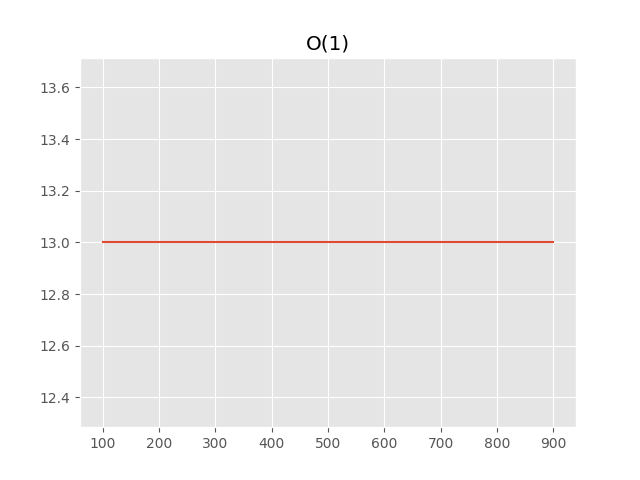
[(100, 13), (200, 13), (300, 13), (400, 13), (500, 13), (600, 13), (700, 13), (800, 13), (900, 13)]

Constant: O(1)

We can see, that hits count not depends at all on the size of the data set, so we can calculate the score by just summing diff with the first hit:

def get_constant_score(hits):
    return sum(abs(hits[0][1] - hit) for _, hit in hits[1:])
    
    
get_constant_score(hits)
0

The next is linear complexity:

def linear(xs):
    result = 0
    for x in xs:
        result += x
    return result
    

hits = [(size, _get_hits(linear, _get_data_set(size)))
        for size in range(100, 1000, 100)]
[(100, 203), (200, 403), (300, 603), (400, 803), (500, 1003), (600, 1203), (700, 1403), (800, 1603), (900, 1803)]

Linear: O(n)

We can notice that the order of growth is linear, so we can use the similar approach as with constant complexity, but with growth instead of hits:

def _get_growth(hits):
    for hit_a, hit_b in zip(hits[:-1], hits[1:]):
        yield abs(hit_a - hit_b)


def get_linear_score(hits):
    hits = [hit for _, hit in hits]
    growth = list(_get_growth(hits))
    return sum(abs(growth[0] - grow) for grow in growth[1:])
    
    
get_linear_score(hits)
0

Now it’s time for quadratic complexity:

def quadratic(xs):
    result = 0
    for x in xs:
        for y in xs:
            result += x + y
    return result


hits = [(size, _get_hits(quadratic, _get_data_set(size)))
        for size in range(100, 1000, 100)]
[(100, 20203), (200, 80403), (300, 180603), (400, 320803), (500, 501003), (600, 721203), (700, 981403), (800, 1281603), (900, 1621803)]

Quadratic: O(n^2)

It’s a bit more complicated in this case, the order of growth of the order of growth (like second derivative) should be the same:

def get_quadratic_score(hits):
    hits = [hit for _, hit in hits]
    growth = list(_get_growth(hits))
    growth_of_growth = list(_get_growth(growth))
    return sum(abs(growth_of_growth[0] - grow)
               for grow in growth_of_growth[1:])


get_quadratic_score(hits)
0

With similar approach detection of O(log(n)), O(n*log(n)) and etc can be implemented.

Usable public API

The code used above is only usable in REPL or a similar interactive environment. So let’s define simple and extensible API. First of all, complexity assumptions:

ComplexityLogEntry = NamedTuple('ComplexityLogEntry', [('size', int),
                                                       ('hits', int)])


class BaseComplexityAssumption(ABC):
    title = ''

    def __init__(self, log: List[ComplexityLogEntry]) -> None:
        self.log = log
        self.hits = [hit for _, hit in self.log]

    @abstractmethod
    def get_score(self) -> int:
        ...

So, for example, an assumption for constant complexity will be like:

class ConstantComplexityAssumption(BaseComplexityAssumption):
    title = 'O(1)'

    def get_score(self) -> int:
        return sum(abs(self.hits[0] - hit) for hit in self.hits[1:])

The next part of public API is Analyzer:

class Complexity:
    def __init__(self, title: str, log: List[ComplexityLogEntry]) -> None:
        ...

    def show_plot(self) -> 'Complexity':
        ...


T = TypeVar('T')


class BaseComplexityAnalyzer(Generic[T], ABC):
    title = ''

    @abstractmethod
    def get_data_set(self, size: int) -> T:
        ...

    @abstractmethod
    def run(self, data_set: T) -> None:
        ...
        
    @classmethod
    def calculate(cls, sizes: Iterable[int]) -> Complexity:
        ...
     
    ...

So we can analyze some quadratic algorithm very easily:

class SomethingQuadratic(BaseComplexityAnalyzer[int]):
    title = 'Something quadratic'

    def get_data_set(self, size) -> List[int]:
        from numpy.random import randint
        return list(randint(1000, size=size))

    def run(self, data_set: Iterable[int]) -> None:
        result = []
        for x in data_set:
            for y in data_set:
                result.append((x, y))
                
                
SomethingQuadratic \
    .calculate(range(100, 1000, 100)) \
    .show_plot()

And it works:

Assumption result

Gist with sources.

Robert Love: Linux Kernel Development


book cover Lately, I was interested in Linux internals, so I decided to read Linux Kernel Development by Robert Love. It’s an interesting book, it explains stuff from interrupts to vfs and memory management. It’s easy to read and contains information why historically something was done like it was.

Although the book is more for beginner kernel developers and contains a lot of code samples of the kernel internals. It’s worth reading if you just interested in how it works inside.

Telegram bot that speaks like a gopnik


book cover TLDR bot – http://t.me/swear_bot (speaks only in Russian)

Saturday night I thought that it would be nice to write a telegram bot that will speak like a gopnik, and sometimes can be used in a conversation (inline mode) to find a relevant reply. So a few beers later I implemented it. As a language I chose JavaScript, but probably Python would be better for this kind of project because of a high variety of NLP related libs. Although for Russian in js exists Az.js, which I’ve used in the bot, and this library has almost everything needed by the bot.

Worth to mention as the bot speaks in russian, examples below are in russian too, I add translation in brackets, but sometimes translation doesn’t have much sens.

The bot/telegram API part isn’t much interesting, it’s straightforward and implemented with node-telegram-bot-api.

Move to the interesting part, how it generate replies? The first option is to find trigger word and reply appropriately, like:

user: Хочу новую машину! (I want a new car!)
bot: Хотеть не вредно! (It doesn’t harm to wish)

First of all, we have a list of trigger words regexp and replies, like:

export const TRIGGERS = [
  [/^к[оа]роч[ье]?$/i, 'У кого короче, тот дома сидит!'],
  [/^хо(чу|тим|тят|тел|тела)$/i, 'Хотеть не вредно!'],
];

Now we need to extract words from our text, it’s easy with Az.Tokens, and check if a word matches any trigger regexp:

const getWords = (text: string): string[] =>
  Az.Tokens(text)
    .tokens
    .filter(({type}) => type === Az.Tokens.WORD)
    .map(({st, length}) => text.substr(st, length).toLowerCase());
  
const getByWordTrigger = function*(text: string): Iterable<string> {
  for (const word of getWords(text)) {
    for (const [regexp, answer] of constants.TRIGGERS) {
      if (word.match(regexp)) {
        yield answer;
      }
    }
  }
};

And that little generator would yield all appropriate replies to text based on trigger words.

The second option is to reply to question with an amusing question, like:

user: Когда мы уже пойдём домой? (When we’ll go home?)
bot: А тебя ебёт? (Why the fuck you care?)

So it’s very easy to implement, we just need to find a question mark at the end of text or question words such a “когда” (when), “где” (where) and etc:

const getAnswerToQuestion = (text: string): string[] => {
  if (text.trim().endsWith('?')) {
    return [constants.ANSWER_TO_QUESTION];
  }

  const questionWords = getWords(text)
    .map((word) => Az.Morph(word))
    .filter((morphs) => morphs.length && morphs[0].tag.Ques);

  if (questionWords.length) {
    return [constants.ANSWER_TO_QUESTION];
  } else {
    return [];
  }
};

It returns an array with amusing constants.ANSWER_TO_QUESTION if a message is a question, otherwise returns an empty array.

The third option is most interesting, is to reply with vulgar rhyme, like:

user: хочу в Австрию! (I want to go to Austria)
bot: хуявстрию (dickstria)
user: у него есть трактор (he have a tractor)
bot: хуяктор (dicktor)

So how it works, it just replaces first syllable in nouns and adjectives with “ху” and transformed vowel from the syllable, like “о” → “ё”, “а” → “я” and etc.

So, first of all, we need to extract the first syllable it’s very easy, we just need all characters before consonant that after the first vowel:

const getFirstSyllable = (word: string): string => {
  const result = [];

  let readVowel = false;

  for (const letter of word) {
    const isVowel = constants.VOWELS.indexOf(letter) !== -1;

    if (readVowel && !isVowel) {
      break;
    }

    if (isVowel) {
      readVowel = true;
    }

    result.push(letter);
  }

  return result.join('');
};

Then we need a function, that will replace the first vowel in a word:

const getRhyme = (word: string): ?string => {
  const morphs = Az.Morph(word);
  if (!morphs.length) {
    return;
  }

  const {tag} = morphs[0];
  if (!tag.NOUN && !tag.ADJF) {
    return;
  }

  const syllable = getFirstSyllable(word);
  if (!syllable || syllable === word) {
    return;
  }

  const prefix = constants.VOWEL_TO_RHYME[last(syllable)];
  const postfix = word.substr(syllable.length);

  return `${prefix}${postfix}`;
};

And then we need a function that extracts words from a text and returns possible rhymes:

const getRhymes = (text: string): string[] =>
  getWords(text)
    .map(getRhyme)
    .filter(Boolean)
    .reverse();

It’s pretty easy, right?

So the last option is to reply confused and aggressive when previous options aren’t working, like:

user: wtf
bot: Чё? (What?)

And it’s straightforward and implemented in a function, that aggregate all options:

export default (text: string): string[] => {
  const answers = uniq([
    ...getByWordTrigger(text),
    ...getAnswerToQuestion(text),
    ...getRhymes(text),
  ]);

  if (answers.length) {
    return answers;
  } else {
    return constants.NO_ANSWERS;
  }
}

That’s all. Telegram bot, sources on github.

How thefuck alias handle command line arguments


TLDR it’s not, thefuck uses functions instead aliases starting from 3.16.

Initially, thefuck alias wasn’t working with command line arguments, if history changing was disabled they were just passed to corrected command. So it was just like:

➜ git br
git: 'br' is not a git command. See 'git --help'.

Did you mean one of these?
	branch
	var
➜ fuck --help
git branch [enter/↑/↓/ctrl+c]
GIT-BRANCH(1)                                          Git Manual                                          GIT-BRANCH(1)

NAME
       git-branch - List, create, or delete branches

SYNOPSIS
       git branch [--color[=<when>] | --no-color] [-r | -a]
               [--list] [-v [--abbrev=<length> | --no-abbrev]]
               [--column[=<options>] | --no-column]
               [(--merged | --no-merged | --contains) [<commit>]] [--sort=<key>]
               [--points-at <object>] [<pattern>...]
...

If history changing was enabled it was less dramatic, it was executing git branch, but it was putting git branch --help in history.

Also there was a lot of feature requests, that can’t be implemented without proper command line arguments supports, like #614 and #531.

So, why there was a problem? Let’s examine old zsh alias, for simplicity with disabled history changing:

alias fuck='TF_CMD=$(
    TF_ALIAS=fuck
    PYTHONIOENCODING=utf-8
    TF_SHELL_ALIASES=$(alias)
    thefuck $(fc -ln -1 | tail -n 1)
) && eval $TF_CMD'

In a few words it was working like:

  • get previous command with fc -ln -1 | tail -n 1 (git br);
  • run thefuck with it (thefuck git br);
  • put result in TF_CMD (TF_CMD=git branch);
  • run the command with eval (eval git branch).

So when fuck was called with arguments like fuck --help it was working like:

TF_CMD=$(
    TF_ALIAS=fuck
    PYTHONIOENCODING=utf-8
    TF_SHELL_ALIASES=$(alias)
    thefuck $(fc -ln -1 | tail -n 1)
) && eval $TF_CMD --help

So in the last step eval git branch --help was called.

As everyone know, bash and zsh don’t allow command line arguments in the middle of alias. So I just replaced aliases with functions.

And there’s another problem – how to distinguish previous command arguments with fuck arguments, and the solution is a dead simple – just use some placeholder, like THEFUCK_ARGUMENT_PLACEHOLDER, between the previous command and fuck arguments.

So now zsh “alias” (with history changing) looks like:

fuck () {
    TF_PREVIOUS=$(fc -ln -1 | tail -n 1);
    TF_CMD=$(
        TF_ALIAS=fuck
        TF_SHELL_ALIASES=$(alias)
        PYTHONIOENCODING=utf-8
        thefuck $TF_PREVIOUS THEFUCK_ARGUMENT_PLACEHOLDER $*
    ) && eval $TF_CMD;
    test -n "$TF_CMD" && print -s $TF_CMD
}

It looks almost the same, but more readable and support nice stuff like:

➜ git br
git: 'br' is not a git command. See 'git --help'.

Did you mean one of these?
	branch
	var
➜ fuck -y
git branch
  614-repeate-option
  620-command-line-arguments
...

➜ hit brunch
➜ fuck -r
git brunch [enter/↑/↓/ctrl+c]
git: 'brunch' is not a git command. See 'git --help'.

Did you mean this?
	branch
git branch [enter/↑/↓/ctrl+c]
  614-repeate-option
  620-command-line-arguments
...

As a drawback, this feature is shell-specific and currently implemented only for bash and zsh. So users of fish, PowerShell and tcsh at this moment can’t use command line arguments with fuck.

Maurice Herlihy: Write Great Code, Volume 1


book cover Recently, for studying, I was sometimes required to use low-level stuff like C, so I decided to read something about low-level things and chose to read Write Great Code, Volume 1 by Randall Hyde. The book is a bit too low-level, it even explains how processors of different architectures work inside, even on transistors level. Also, this book contains interesting information about how memory works on different levels and how processor uses different types of memory. Chapters about primitive data structures aren’t so interesting, but they give basic knowledge of how things work inside.

Although this book can look a bit outdated, especially in the chapter about IO, it’s interesting to read and somehow it’s even entertaining.

Simplify complex React components with generators


Sometimes writing complex React components, like huge dynamic forms, isn’t easy. By default for control flow in JSX we use conditional operator, so, for example, a complex form with some logic will look like:

class Form extends Component {
  propTypes: {
    importedAccount: boolean,
    corporateClient: boolean,
  };

  render() {
    return (
      <div>
        <form>
          {!this.props.importedAccount ? (
              <label>
                First Name
                <input type="text"/>
              </label>
            ) : null}
          {!this.props.importedAccount ? (
              <label>
                First Name
                <input type="text"/>
              </label>
            ) : null}
          {this.props.corporateClient ? (
              <label>
                Organization
                <input type="text"/>
              </label>
            ) : null}
          {this.props.corporateClient ? (
              <label>
                Role
                <input type="text"/>
              </label>
            ) : null}
          {!this.props.corporateClient ? (
              <label>
                Billing address
                <input type="text"/>
              </label>
            ) : null}
        </form>
      </div>
    );
  }
}

But that much of ternary operators looks ugly. And explicitly writing ... ? ... : null isn’t fun at all. So we can try a bit different approach, we can extract all these inputs to separate methods, like:

class Form extends Component {
  propTypes: {
    importedAccount: boolean,
    corporateClient: boolean,
  };

  renderFirstNameInput() {
    if (!this.props.importedAccount) {
      return (
        <label>
          First Name
          <input type="text"/>
        </label>
      );
    }
  }

  renderLastNameInput() {
    if (!this.props.importedAccount) {
      return (
        <label>
          First Name
          <input type="text"/>
        </label>
      );
    }
  }

  renderOrganizationInput() {
    if (this.props.corporateClient) {
      return (
        <label>
          Organization
          <input type="text"/>
        </label>
      );
    }
  }

  renderRoleInput() {
    if (this.props.corporateClient) {
      return (
        <label>
          Role
          <input type="text"/>
        </label>
      );
    }
  }

  renderBillingAddressInput() {
    if (!this.props.corporateClient) {
      return (
        <label>
          Billing address
          <input type="text"/>
        </label>
      );
    }
  }

  render() {
    return (
      <div>
        <form>
          {this.renderFirstNameInput()}
          {this.renderLastNameInput()}
          {this.renderOrganizationInput()}
          {this.renderRoleInput()}
          {this.renderBillingAddressInput()}
        </form>
      </div>
    );
  }
}

Looks much nicer, but it’s a bit bloated, there’s too much code. Another approach is to create some generator method and convert it to an array in render method, like:

class Form extends Component {
  propTypes: {
    importedAccount: boolean,
    corporateClient: boolean,
  };

  *renderForm() {
    if (!this.props.importedAccount) {
      yield (
        <label key="first-name">
          First Name
          <input type="text"/>
        </label>
      );
      yield (
        <label key="last-name">
          Last Name
          <input type="text"/>
        </label>
      );
    }

    if (this.props.corporateClient) {
      yield (
        <label key="organization">
          Organization
          <input type="text"/>
        </label>
      );
      yield (
        <label key="role">
          Role
          <input type="text"/>
        </label>
      );
    } else {
      yield (
        <label key="billing-address">
          Billing address
          <input type="text"/>
        </label>
      );
    }
  }

  render() {
    return (
      <div>
        <form>
          {[...this.renderForm()]}
        </form>
      </div>
    );
  }
}

So it looks much nicer, there’s far way less code than in methods approach, it looks less hackish than conditional operator approach. And we finally can have easily readable control flow.

Testing React Native components without enzyme


In React world enzyme is very popular, but it works poorly with react-native and requires some ugly mocks.

So I thought it would be easier to test components without it. First of all, React offers us react-test-renderer, that can render components to JSON:

import { View, Text, Button } from 'react-native';
import ReactTestRenderer from 'react-test-renderer';

const rendered = ReactTestRenderer.create(
  <View>
    <Text>Hello</Text>
    <Button title="OK" onPress={() => console.log('OK')}/>
  </View>
).toJSON();

console.log(rendered);

As a result, we got some big object:

{
  "type": "View",
  "props": {},
  "children": [
    {
      "type": "Text",
      "props": {
        "accessible": true,
        "allowFontScaling": true,
        "ellipsizeMode": "tail"
      },
      "children": [
        "Hello"
      ]
    },
    {
      "type": "View",
      "props": {
        "accessible": true,
        "accessibilityComponentType": "button",
        "accessibilityTraits": [
          "button"
        ],
        "style": {
          "opacity": 1
        },
        "isTVSelectable": true
      },
      "children": [
        {
          "type": "View",
          "props": {
            "style": [
              {}
            ]
          },
          "children": [
            {
              "type": "Text",
              "props": {
                "style": [
                  {
                    "color": "#0C42FD",
                    "textAlign": "center",
                    "padding": 8,
                    "fontSize": 18
                  }
                ],
                "accessible": true,
                "allowFontScaling": true,
                "ellipsizeMode": "tail"
              },
              "children": [
                "OK"
              ]
            }
          ]
        }
      ]
    }
  ]
}

It’s already not too hard to find children components which you want to test, but I prefer using a little utility function:

import { flatMap } from "lodash";

const query = (node, match) => {
  let result = [];
  let notProcessed = [node];

  while (notProcessed.length) {
    result = [...result, ...notProcessed.filter(match)];
    notProcessed = flatMap(notProcessed, ({children}) => children || []);
  }

  return result;
};

With which it’s easy to find, for example, all Text nodes:

query(rendered, ({type}) => type === 'Text');

[
  {
    type: 'Text',
    props: {
      accessible: true,
      allowFontScaling: true,
      ellipsizeMode: 'tail'
    },
    children: ['Hello']
  },
  {
    type: 'Text',
    props: {
      style: [Object],
      accessible: true,
      allowFontScaling: true,
      ellipsizeMode: 'tail'
    },
    children: ['OK']
  }
]

You can notice that we have Text node for our Button, it’s because of underlying realization of Button component, if we don’t want to see insides of some component, we can easily mock it:

jest.mock('Button', () => 'Button');
query(rendered, ({type}) => type === 'Button');

[{
  type: 'Button',
  props: {title: 'OK', onPress: [Function: onPress]},
  children: null
}];

Enzyme has a useful method simulate, instead of it, we can just call callbacks properties, like onPress on out button:

query(rendered, ({type}) => type === 'Button')[0].onPress();

// OK

It’s harder when you need to pass an event object to a callback, but it always can be mocked.

Finding leaking tests with pytest


On one project we had a problem with leaking tests, and problem was so huge that some tests was leaking even for a few GB. We tried pytest-leaks, but it was a bit overkill and didn’t worked with our python version. So we wrote a little leak detector by ourselves.

First of all we got consumed RAM with psutil:

import os
from psutil import Process

_proc = Process(os.getpid())


def get_consumed_ram():
    return _proc.memory_info().rss

Then created some log of ram usage, where nodeid is a special pytest representation of test, like tests/test_service.py::TestRemoteService::test_connection:

from collections import namedtuple

START = 'START'
END = 'END'
ConsumedRamLogEntry = namedtuple('ConsumedRamLogEntry', ('nodeid', 'on', 'consumed_ram'))
consumed_ram_log = []

And logged ram usage from pytest hooks, which we just put in conftest.py:

def pytest_runtest_setup(item):
    log_entry = ConsumedRamLogEntry(item.nodeid, START, get_consumed_ram())
    consumed_ram_log.append(log_entry)


def pytest_runtest_teardown(item):
    log_entry = ConsumedRamLogEntry(item.nodeid, END, get_consumed_ram())
    consumed_ram_log.append(log_entry)

Pytest calls pytest_runtest_setup before each test, and pytest_runtest_teardown after.

And after all tests we print information about tests leaked more than allowed (10MB in our case) from pytest_terminal_summary hook:

from itertools import groupby

LEAK_LIMIT = 10 * 1024 * 1024


def pytest_terminal_summary(terminalreporter):
    grouped = groupby(consumed_ram_log, lambda entry: entry.nodeid)
    for nodeid, (start_entry, end_entry) in grouped:
        leaked = end_entry.consumed_ram - start_entry.consumed_ram
        if leaked > LEAK_LIMIT:
            terminalreporter.write('LEAKED {}MB in {}\n'.format(
                leaked / 1024 / 1024, nodeid))

So after running tests we got our leaking tests, like:

LEAKED 712MB in tests/test_service.py::TestRemoteService::test_connection

App for using your phone as an Apple-like Touch Bar


screenshot

The idea of MacBook Touch Bar looks interesting, having custom controls for opened apps like a button for running tests when you use IDE or player controls when you watching movie. But it’s only available on new MacBook Pro. So I thought that would be nice to have something similar, but with phone instead of Touch Bar. Also I thought that it would be nice to make it easily extensible.

TLDR PhoneTouch, it’s very experimental, and by this time only linux supported (but you can easily add support of other OS). You can install and run it with:

npm install -g phone-touch
phone-touch

Also you need to install mobile app on Android from apk, or build it manually if you have an iOS device.

So how it works? If very simplified, app just watches for events on a desktop (like switching windows, etc) and remote-renders JSX components on a phone.

graph LR A[Desktop app]-- WebSocket ---B[Mobile app]

Desktop app

Let’s start with desktop app, because it’s more interesting.

graph LR A[Data Source]-- Emit new data -->B[Rules] B-- Controls -->C[WS server] C-- Event from client -->D[Callbacks registry] B-- Callbacks from controls -->D

Data sources

The first interesting thing in the desktop app are data sources.

graph LR A[xdotool]-- Current window -->B[Aggregated data source] C[pulseaudio]-- Volume -->B D[playerctl]-- Current song -->B

Data sources are special functions (interval, callback) -> void, which calls callback every interval ms with current value. So, for example, data source that gets current window title, pid and executable path looks like:

import { exec } from 'child_process';

const getExecutable = (pid, callback) =>
  exec(`readlink -f /proc/${pid}/exe`, (error, stdout, stderr) =>
    callback(stdout.split('\n')[0])
  );

const getWindow = (callback) =>
  exec('xdotool getwindowfocus getwindowname getwindowpid',
    (error, stdout, stderr) => {
      const [title, pid, ..._] = stdout.split('\n');
      getExecutable(pid, (executable) => callback({title, pid, executable}));
    });

export default (interval, callback) => exec('xdotool -h', (error) => {
  if (error) {
    return;
  }

  setInterval(
    () => getWindow((window) => callback({window})),
    interval);
});

Every interval ms it gets current window by calling xdotool, than gets executable and calls callback({window: {title, pid, executable}). It’s a bit not efficient, but it works.

Data sources results we use in another significant part – rules.

Rules

graph LR A[chrome]-- Chrome controls -->B[Aggregated controls] C[idea]-- IntelliJ IDEA controls -->B D[netflix]-- Netflix controls -->B E[player]-- Audio player controls -->B F[pulseaudio]-- Pulseaudio volume controls -->B G[VLC]-- VLC controls -->B

Rules are functions ({data-sources}) -> control?. Let’s look to a rule that shows controls for VLC:

import controls, { View, TouchableHighlight, Icon, Text } from '../controls';
import { sendKey } from '../utils';

const styles = {
  title: {color: '#ffffff', fontSize: 10},
  controlsHolder: {flexDirection: 'row'},
  control: {color: '#ffffff', fontSize: 60}
};

export default ({window}) => {
  if (window.title.search('VLC media player') === -1) {
    return;
  }

  return (
    <View key="vlc-group">
      <Text style={styles.title}
            key="vlc-title">VLC</Text>
      <View style={styles.controlsHolder}
            key="vlc-icons">
        <TouchableHighlight onPress={() => sendKey('ctrl+Left')}
                            key="vlc-rewind">
          <Icon style={styles.control} name="rotate-left"/>
        </TouchableHighlight>
        <TouchableHighlight onPress={() => sendKey('space')}
                            key="vlc-play">
          <Icon style={styles.control} name="play-arrow"/>
        </TouchableHighlight>
        <TouchableHighlight onPress={() => sendKey('ctrl+Right')}
                            key="vlc-fast-forward">
          <Icon style={styles.control} name="rotate-right"/>
        </TouchableHighlight>
        <TouchableHighlight onPress={() => sendKey('f')}
                            key="vlc-fullscreen">
          <Icon style={styles.control} name="fullscreen"/>
        </TouchableHighlight>
        <TouchableHighlight onPress={() => sendKey('m')}
                            key="vlc-mute">
          <Icon style={styles.control} name="volume-mute"/>
        </TouchableHighlight>
      </View>
    </View>
  );
};

You can notice that we use JSX with React Native components (and Icon from Vector Icons) here even with callbacks. But how it works? First of all we use "pragma": "controls" for transform-react-jsx plugin in .babelrc:

{
  "presets": ["es2015"],
  "plugins": [
    ["transform-react-jsx", {
      "pragma": "controls"
    }],
    "transform-object-rest-spread",
    "syntax-flow",
    "transform-flow-strip-types"
  ]
}

So code like:

<TouchableHighlight onPress={() => sendKey('m')}
                    key="vlc-mute">
  <Icon style={styles.control} name="volume-mute"/>
</TouchableHighlight>

We’ll be translated to:

controls(
  TouchableHighlight,
  {onPress: () => sendKey('m'), key='vlc-mute'},
  controls(Icon, {style: styles.control, name: 'volume-mute'})); 

Where TouchableHighlight is a string, we defined all supported components as strings in the desktop app, like:

export const View = 'View';
export const Image = 'Image';
export const Icon = 'Icon';
export const TouchableHighlight = 'TouchableHighlight';
export const Slider = 'Slider';
export const Text = 'Text';
export const Button = 'Button';

So controls function can serialize our control to:

{
  tag: 'TouchableHighlight',
  props: {
    onPress: {callbackId: '8c9084e97cb9412eaa0ea68cd658609b'},
    key='vlc-mute'
  },
  children: [{
    tag: 'Icon',
    props: {
      style: {color: '#ffffff', fontSize: 60},
      name: 'volume-mute'
    }
  }]
}

You can notice that we replaced function with {callbackId}, so we can serialize controls to json and send them to mobile app. All callback stored in a special registry, that we clean before controls update.

WebSocket server

The last part of the desktop app is a WebSocket server.

graph LR A[WS client]-- Callbacks calls -->B[WS server] B-- Controls -->A

It sends new controls to clients when data source emits new data and listens to events from clients then calls appropriate callbacks from registry.

Mobile app

Mobile app is just a plain simple React Native + Redux + Redux Thunk app.

graph LR A[WS client]-- Controls -->B[Action] B-- Controls -->C[Reducer] C-- Controls -->D[Component] D-- Callbacks calls -->E[Action] E-- Callbacks calls -->A

So the only interesting thing here is a rendering of controls, first of all we created object with all supported components:

import * as reactNativeComponents from 'react-native';
import Icon from 'react-native-vector-icons/MaterialIcons';

this._components = {Icon, ...reactNativeComponents};

And then we can recursively create components from controls received from the desktop app with React.createElement:

_prepareChildren(children) {
  if (!children)
    return null;

  children = children.map(this._renderControl);

  if (children.length === 1) {
    return children[0];
  } else {
    return children;
  }
}

_renderControl(control) {
  if (isString(control))
    return control;

  const component = this._components[control.tag];
  if (!component) {
    console.warn('Unexpected component type:', control);
    return;
  }

  const props = this._prepareProps(control.props);
  const children = this._prepareChildren(control.children);

  return React.createElement(component, props, children);
}

As long as we propagate callback to the desktop app, we need to process all props and wrap callbacks in a special functions, which would emit action for sending callbacks to the desktop app:

_prepareArg(arg) {
  try {
    JSON.stringify(arg);
    return arg;
  } catch (e) {
    return '';
  }
}

_callback(callback) {
  return (...args) => this.props.callbackCalled({
    args: args.map(this._prepareArg),
    ...callback
  })
}

_prepareProps(props) {
  if (!props)
    return {};

  for (const key in props) {
    if (isObject(props[key]) && props[key].callbackId) {
      props[key] = this._callback(props[key]);
    }
  }

  return props;
}

And that’s all. Summarizing everything we got an app that acts in a similar to Touch Bar way, but simplified a lot.

Sources on github.